I thought this post from Antoine Antoun on LinkedIn was worth sharing…
Before Power Fx, ribbon buttons had to be developed using custom JavaScript or the Ribbon Workbench tool. Even small changes required full solution deployments, making the process slower and less transparent for business users.
Now, with custom ribbon buttons in Dynamics 365 built using Power Fx, creating and updating buttons has become faster, easier, and more transparent.
What it means?
1. Simplifies complex actions into a single click
2. Built with low-code logic using Power Fx
3. Flexible and easy to maintain for future needs
📓Use case:
I recently worked on a Dynamics 365 scenario where records with a status of Qualified became read-only and deactivated, but the user still needs to change the value of a specific field after qualification.
Normally, users would need to reactivate the record, update the field, and then requalify it.🤔
(⚠️ A process prone to confusion and errors, like forgetting to requalify the record! ⚠️)
🚀 Solution:
A Power Fx ribbon button can update the necessary field directly from the ribbon, bypassing the whole process step. This approach simplifies the process, reduces errors, and improves the user experience.
How it works:
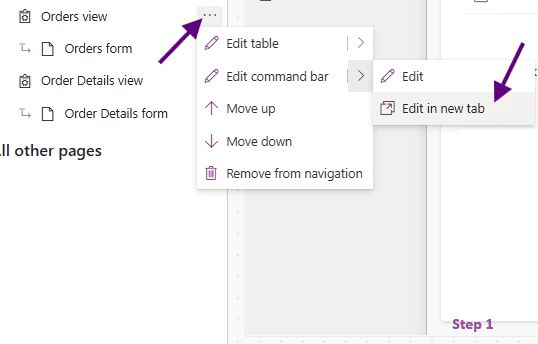
1. Open your D365 CRM (or Model Driven App) and edit the entity form.
2. Select “Edit Command Bar” for the entity’s main form (see Image 1).
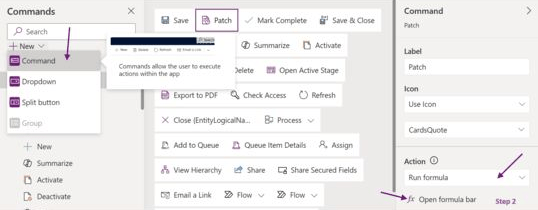
3. Create a new command and choose “Run Formula” as the action (Image 2).
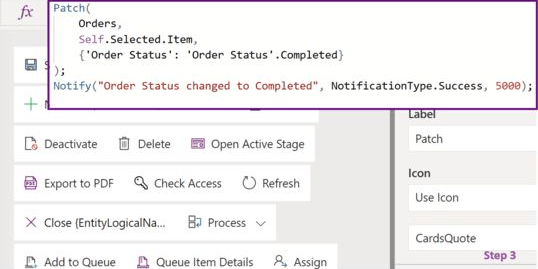
4. In the “OnSelect” property, specify your Power Fx formula (Image 3). You can also control the visibility of the button based on field values.
This approach demonstrates how Power Fx makes low-code customizations faster, safer, and more user-friendly. 🚀
Step 1
Step 2
Step 3

Leave a comment