In October, I was a speaker at Community Summit in Orlando, Florida! In this post, I would like to share some of the content from my session.
What is Power Automate?
- Cloud-based low-code platform that allows makers to automate business processes
- Replacement for Classic Dataverse background workflows
- If you are on-premise, you will need:
- CRM 2016 (8.2) or later with IFD enabled and ADFS/IFD configured
- Dataverse (Dynamics 365) connector or On-Premises Data Gateway
- Power Automate licenses
There are other limitations for on-premise. Here is a link that provides additional information on those: Is Power Automate available on-premises?
What stood out right away?
When I made the shift from using classic workflows to using Power Automate, these are the things that stood out right away to me.
- Power Automate can handle 1 to Many relationships!
- “from this contact, get me a list of their open opportunities…”
- Power Automate has trigger conditions!
- “run this cloud flow anytime the contact email field is modified and the field is null“
- Power Automate has switch statements!
- I can configure a different action for each choice
How do I get started?
- Go to make.powerautomate.com or make.powerapps.com
- Open your solution
- Click +New
- Select Automation
- Select Cloud Flow
- Select Automated, Instant or Scheduled
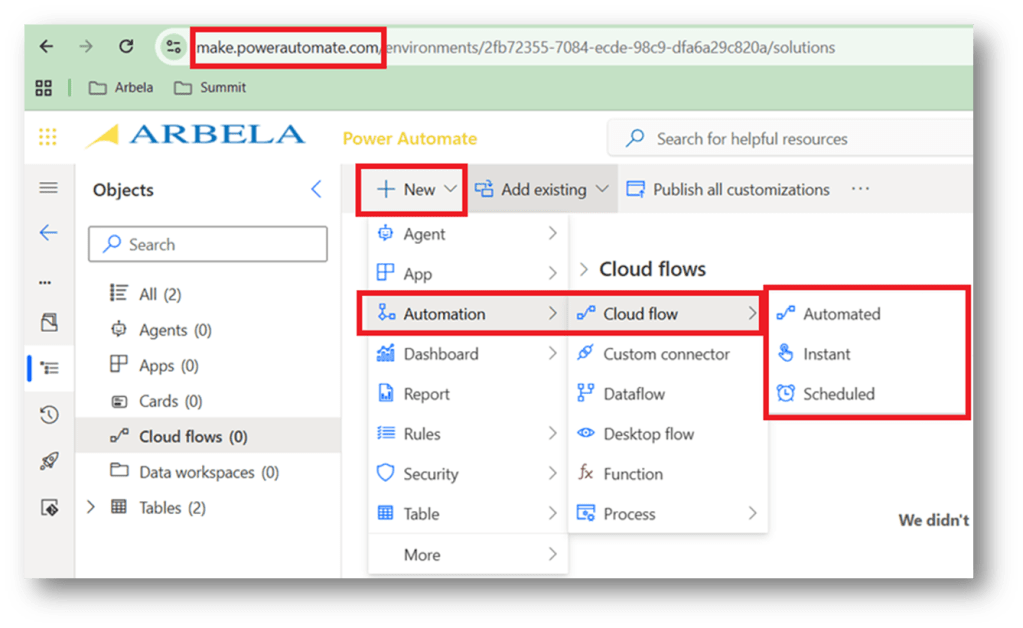
Types of Cloud Flows
- Scheduled – runs on a scheduled cadence
- Automated – triggered by an event
- Instant – start with the click of a button
Source: https://learn.microsoft.com/en-us/power-automate/overview-cloud#types-of-cloud-flows
Scheduled
- Enter your flow name
- Starting date & time
- Repeat every X
- Month
- Week
- Day
- Hour
- Minute
- Second
Source: https://learn.microsoft.com/en-us/power-automate/run-scheduled-tasks?tabs=without-copilot

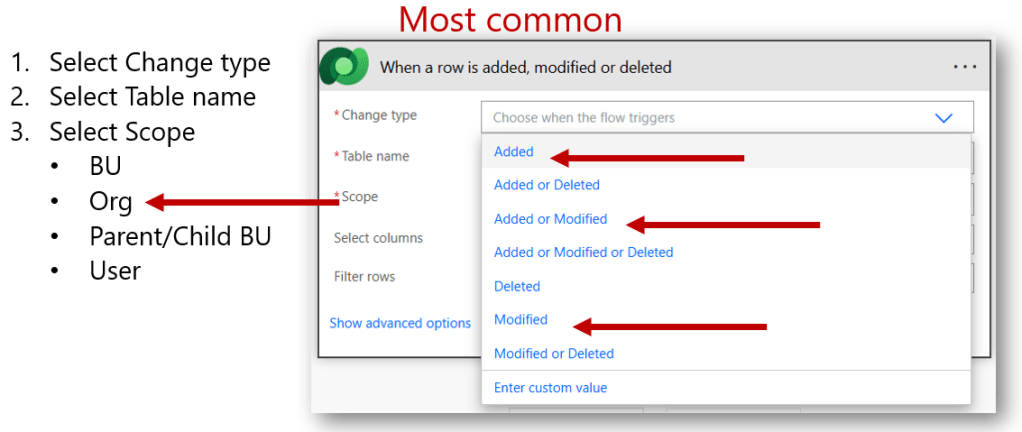
Automated
- Enter your flow name
- Choose your flow’s trigger

Triggers
Source:
- https://learn.microsoft.com/en-us/power-automate/customize-triggers?tabs=new-designer#add-conditions-to-your-trigger
- https://learn.microsoft.com/en-us/power-automate/dataverse/create-update-delete-trigger?tabs=new-designer
Select columns
Define the specific columns that when modified would trigger the flow to run
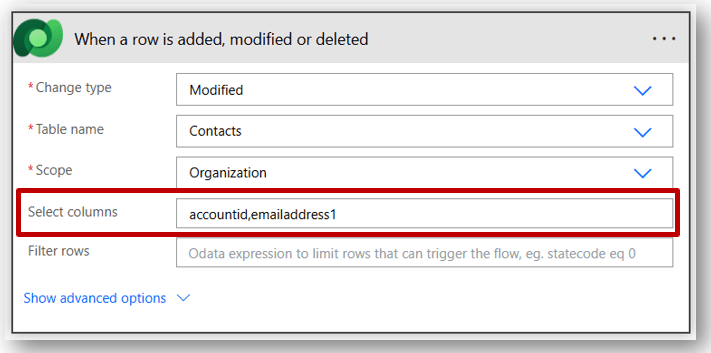
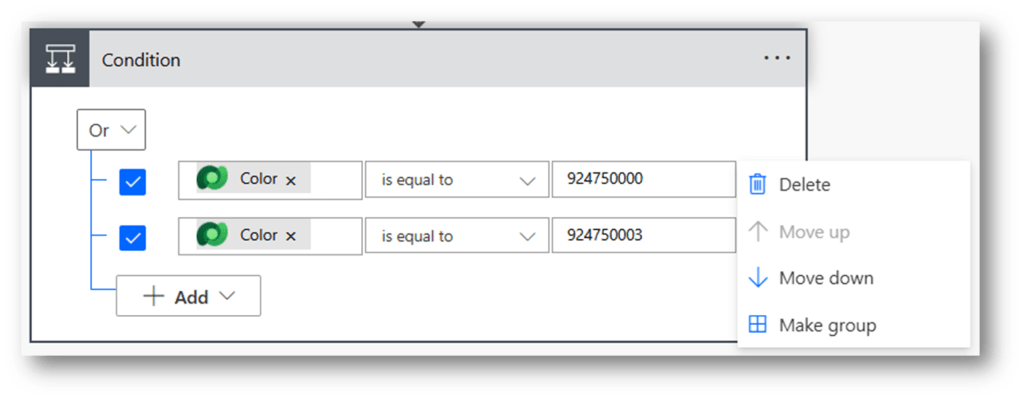
Filter rows
Enter an expression to define the trigger more precisely. The flow only runs when the expression is true.

OData format
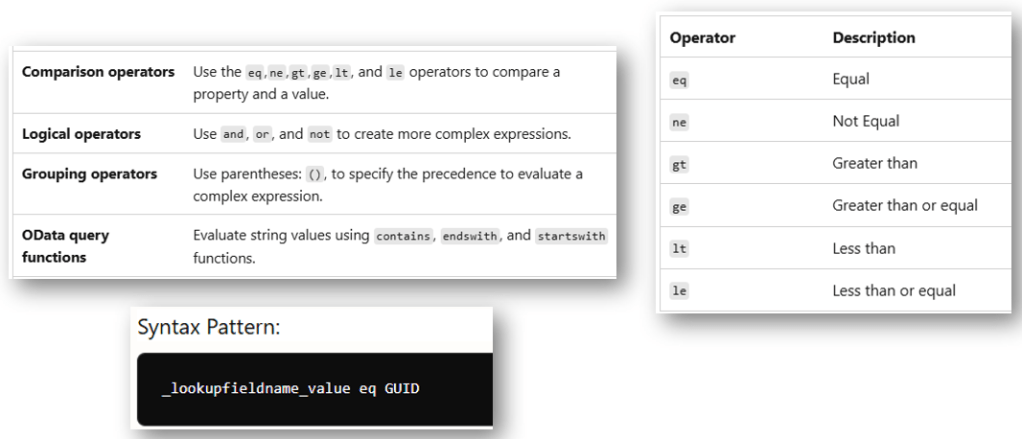
Source: https://learn.microsoft.com/en-us/azure/search/search-query-odata-comparison-operators
Actions
Add a new row
- Select Table name
- Set values
Source: https://learn.microsoft.com/en-us/power-automate/dataverse/create
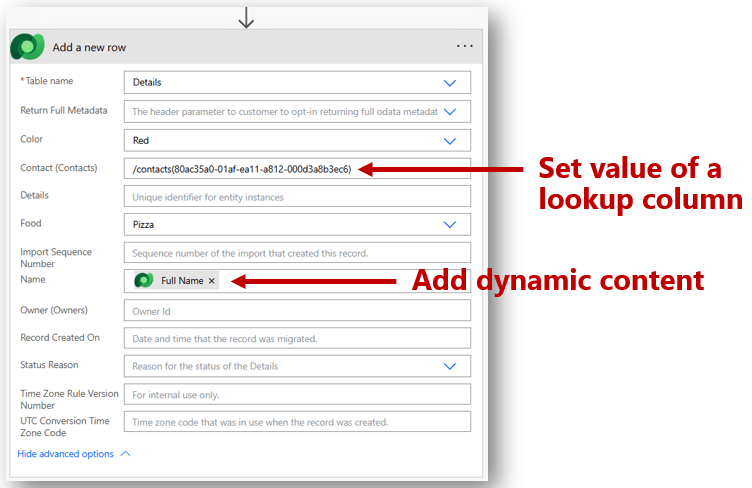
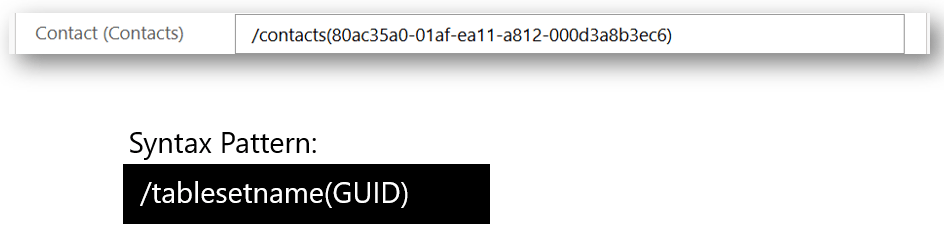
Set value of a lookup column
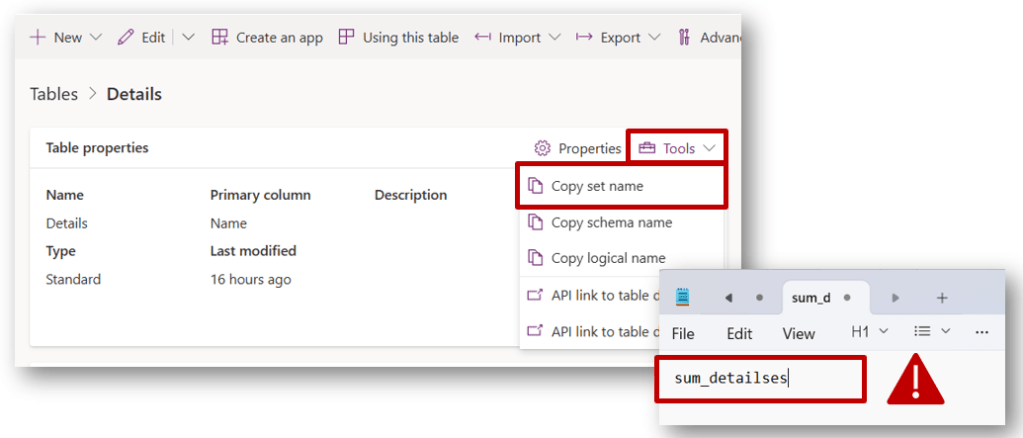
Copy set name
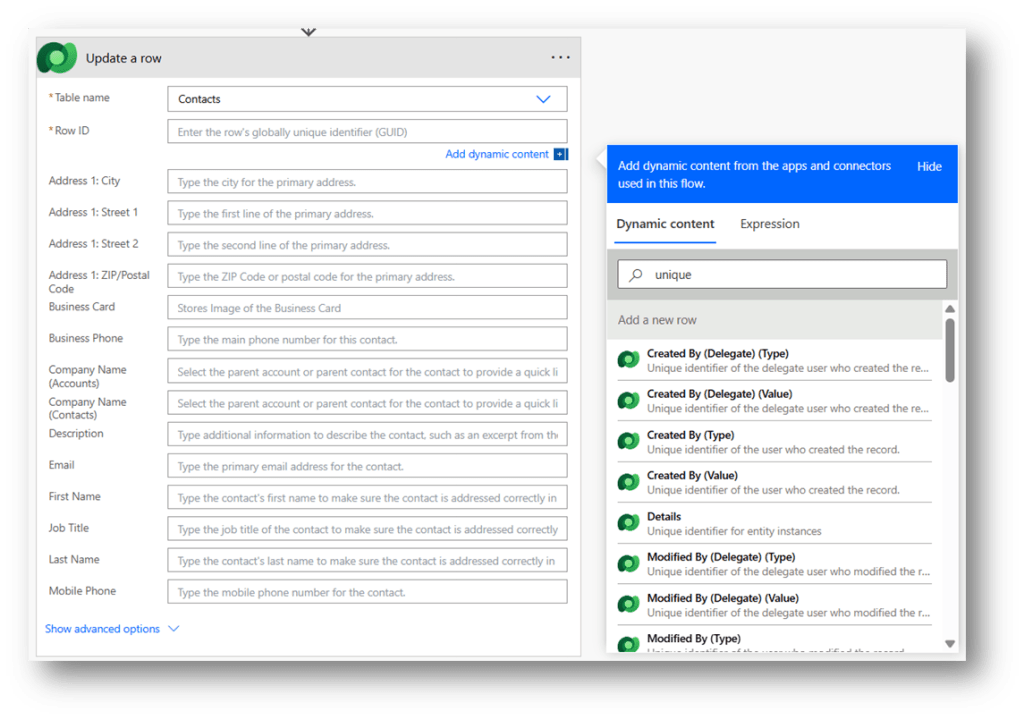
Update a row
- Select Table name
- Enter Row ID
- Set values
Source: https://learn.microsoft.com/en-us/power-automate/dataverse/update
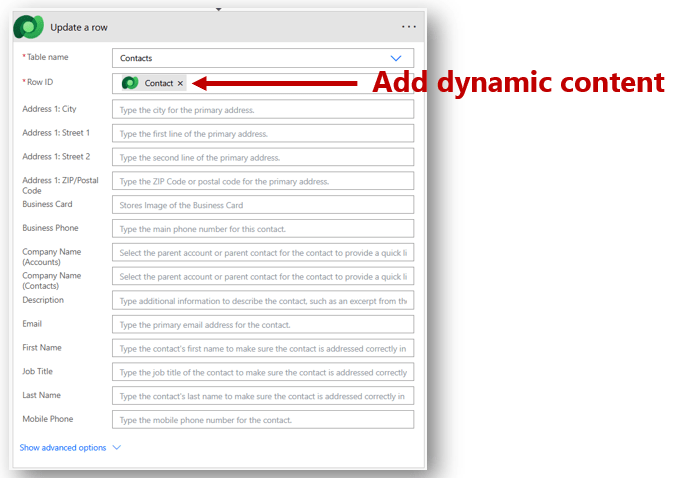
Add Dynamic Content
Allows you to add values from a previous step
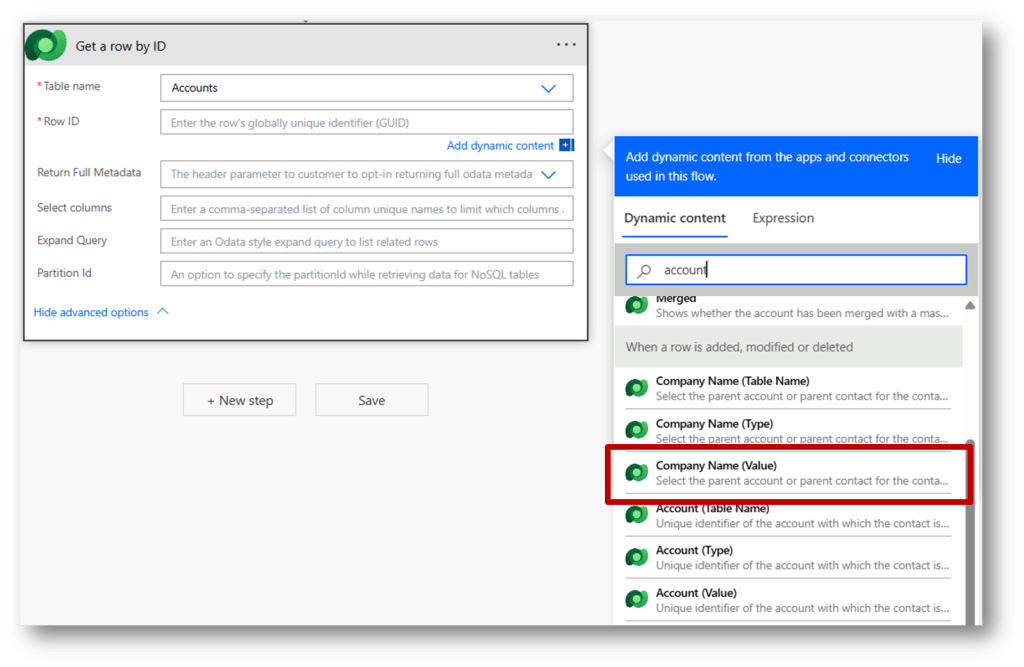
Get a row by ID
- Select Table name
- Enter Row ID
- Enter Select columns
- Enter Expand Query (optional)
Source: https://learn.microsoft.com/en-us/power-automate/dataverse/get-row-id
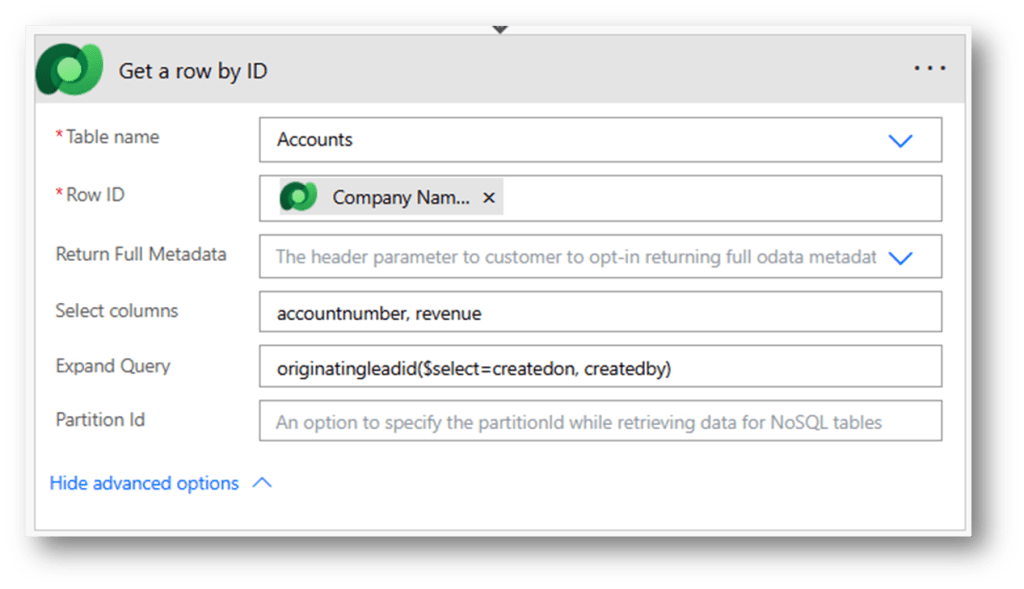
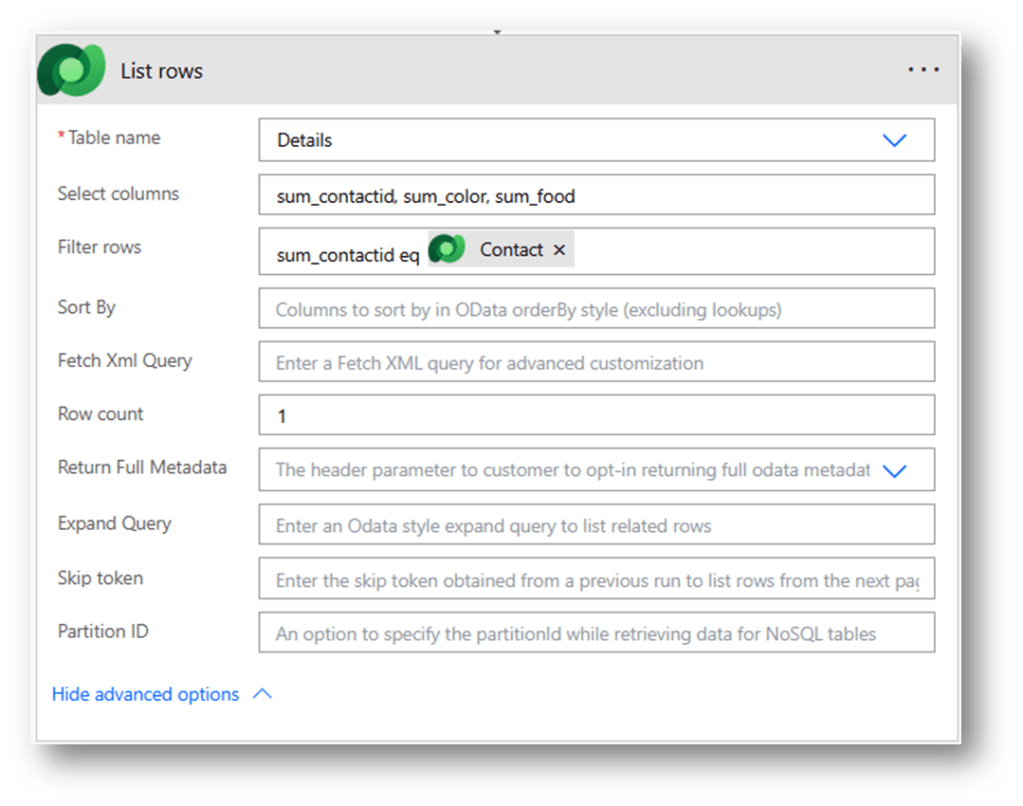
- Select columns – comma separated list to limit which columns are returned
- Expand query – OData style expression to list related rows/columns

List rows
- Table name
- Select columns
- Filter rows
- Row count
- Expand query
Source: https://learn.microsoft.com/en-us/power-automate/dataverse/list-rows?tabs=new-designer
Controls
Condition
Run a different set of actions based on whether the condition is true or false
Source: https://learn.microsoft.com/en-us/power-automate/add-condition
Switch
Run a different set of actions based on a value

Apply to each
Run the same set of actions on each row in a list

Scope
A scope is a container that groups actions together, making it easier to organize and visualize the parts of your workflow. When a workflow becomes larger and more intricate, scopes help keep things organized and simplify troubleshooting.
- Group related actions. When you have a set of actions that are logically related, group them into a scope. This approach keeps related tasks together and makes it easier to understand the purpose of each section.
- Organize your flow. Scopes create a hierarchical structure within your flow. You can nest scopes to break down your workflow into smaller, more manageable sections. A hierarchical organization makes it easier to understand and manage complex workflows.
- Make your flow easier to read. Collapse scopes to hide their contents, making it easier to read the flow or to focus on one part of it. Collapsing scopes helps keep your workspace neat and organized, especially when you’re working with large and complex flows.
Source: https://learn.microsoft.com/en-us/power-automate/scopes?tabs=new-designer
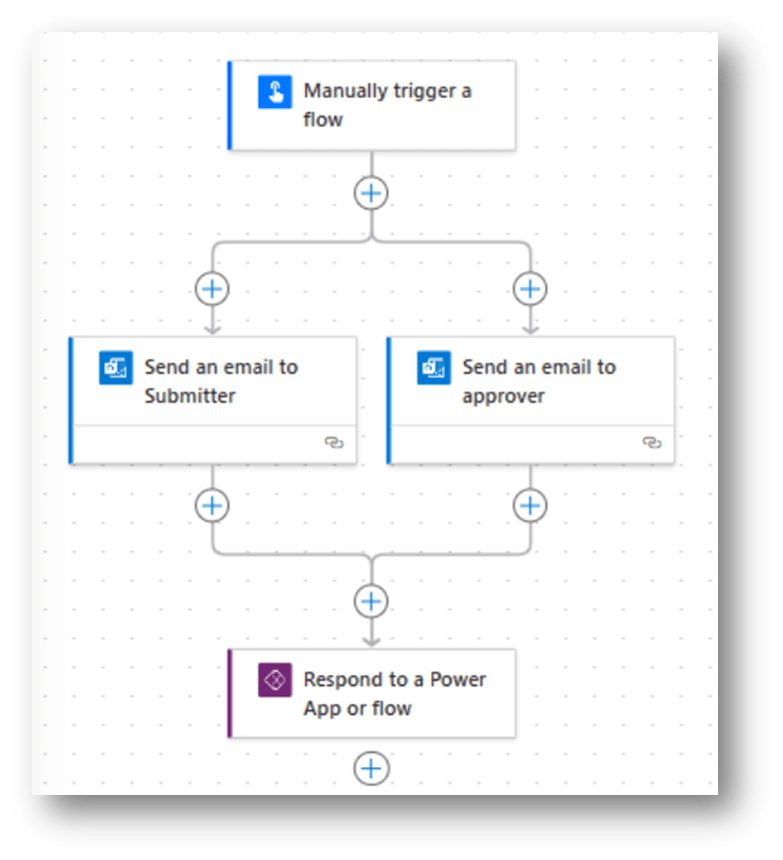
Parallel branch
Add a parallel branch
Run two or more steps simultaneously. The flow continues only after all parallel steps are complete. This capability make processing more efficient.
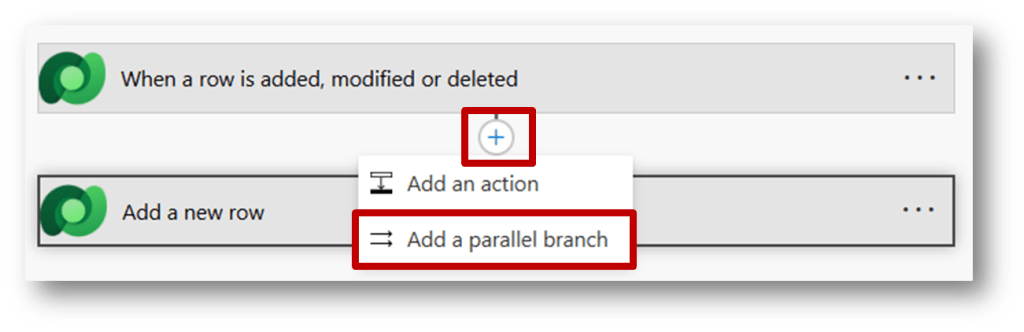
Example of execute in parallel
Tips
- Add trigger conditions
- Use table set name when setting the value of a lookup column
- Specify columns when you Get a row by ID
- Specify columns and filters when you List rows
- Always label your steps
- Use the Scope control to organize your flow
- As you are building, test and test often — use Compose
- Use variables

Leave a comment